 |
|
You are here: Foswiki>KnowledgeBase Web>AutoLogintoDomainAccount (06 Apr 2021, AggelikiAnagnostopoulou)Edit Attach
Automatic Login Windows
FROM USER ACCOUNTS
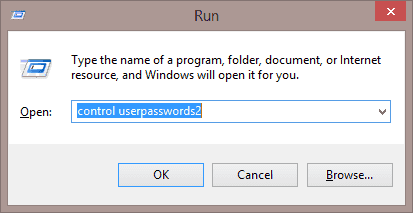
- Hold the Windows Key and press “R” to bring up the Run dialog box.
- Type “control userpasswords2” without quotes, then select “OK“.
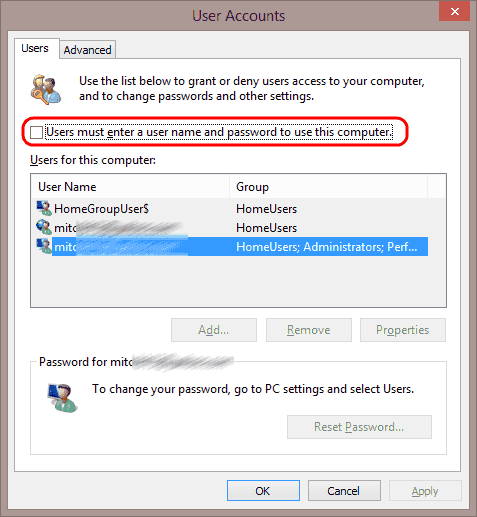
- The “User Accounts” box appears. Uncheck the “Users must enter a user name and password to use this computer.” box. Select “OK” when you’re done.
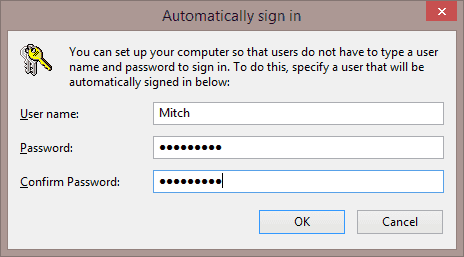
- You will be prompted to enter the username and password for the account you wish to use automatically when Windows starts. Type the User name and password in both the “Password” and “Confirm Password” fields, then select “OK“.
FROM THE REGISTRY
- Press the Windows key + R to bring up the Run box. Type regedit and hit Enter.
- When the Registry Editor opens, navigate to the following registry location:
HKEY_LOCAL_MACHINE\SOFTWARE\Microsoft\Windows NT\CurrentVersion\Winlogon - In the right pane, you need to modify or create each of these registry entries:
DefaultUserName,DefaultPassword,DefaultDomainName,AutoAdminLogon. If any of these keys are missing, create a new String Value (REG_SZ). - Double-click the
DefaultUserNameentry, type the user name to log on with, and then click OK. - Double-click the
DefaultPasswordentry, type the password for the user account under the value data box, and then click OK. - Double-click on
DefaultDomainName, and specify the domain name of the user account. If it’s local user, specify local host name. - Double-click the
AutoAdminLogonentry, setAutoAdminLogonto 1 to enable the auto logon. IfAutoLogonCountorAutoLogonCheckedexists, delete it.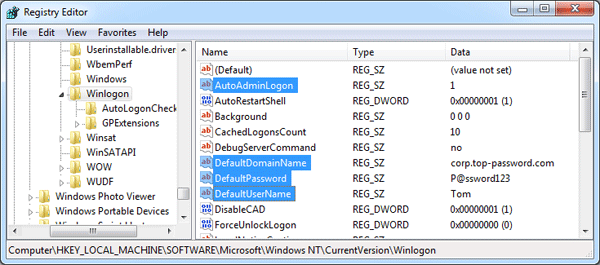
Edit | Attach | Print version | History: r2 < r1 | Backlinks | View wiki text | Edit wiki text | More topic actions
Topic revision: r2 - 06 Apr 2021, AggelikiAnagnostopoulou
- Toolbox
-
 Create New Topic
-
 Index
Index
-
 Search
-
 Changes
-
 Notifications
-
 RSS Feed
-
 Statistics
-
 Preferences
- Webs
-
 KnowledgeBase
Copyright © enLogic